Sewart Convert Pictures to Applique Make Logos Art!
How to digitize a patch using SewArt and SewWhat Pro
By on September 16th, 2020
This site contains affiliate links to products. We may receive a committee for purchases made through these links.
![]()
A while back I created a tutorial on how to make a patch using your embroidery machine. Perhaps you may recall that the patch I created was comprised of my featherbrained lego face design, which really leant itself to beingness turned into a patch. Just what if y'all want to turn any old embroidery design into a patch? It'southward actually pretty easy to digitize a patch yourself with any design you own or have digitized using SewArt and SewWhat Pro.
Why practice you lot need to digitize a patch if you already own the embroidery blueprint?
Some automobile embroidery designs volition simply not make a suitable patch, such as ones comprised of outlines or open shapes. The patch needs to be a standalone object, so if the embroidery pattern is not completely filled it will demand to accept fabric behind it. Ok – so yous can stitch the design on some fabric, but and then how will the edges be finished? If y'all trim the fabric around the contour of the design or in a simple shape surrounding the design, you lot'll still cease up with a rough edge.
Typically patches take a satin stitch edge around the outside exactly like an appliqué design. This is why appliqué designs (like my silly lego face design) make expert patches as is. Just, to make a patch from any onetime embroidery pattern, you will need to combine the embroidery design with a unproblematic appliqué shape.
Alternatives to digitizing a patch
There are a few different ways you can obtain the simple appliqué shapes if you don't desire to digitize it yourself. I believe that some of the sites offering free embroidery designs have some uncomplicated appliqué shapes. The but downside is that I would imagine a free blueprint would non come with a lot of different sizes. An alternative to hunting down a gratis embroidery design is to purchase a basic appliqué circumvolve or square blueprint.
If you get a bones appliqué shape, you tin simply follow my instructions for creating a patch and do it in 2 steps. First you would run up out the appliqué and so the design on top. Nevertheless, if you don't combine the two designs, so you may struggle a bit with placement. It would be merely a piddling bit more cumbersome, peculiarly if y'all want to sew together out a whole bunch of patches at in one case. This is why I recommend combining the designs as described below.
Fortunately this is very like shooting fish in a barrel to do using SewArt and SewWhat Pro. In fact you tin can fifty-fifty accomplish this task, using the free trial versions of these programs.
Why brand a patch?
Earlier nosotros go too far into the weeds, you lot may be wondering why you lot might want to create a patch from an embroidery design in the first place. Well, there are several reasons.
Some items are very difficult to embroider on. For example baseball caps can be a trivial fleck tricky, especially if y'all simply have a home embroidery auto. Sometimes it's easier to but iron on a patch, specially if the hat is quite stiff.
Another reason why you may want to stitch out a patch is if you don't take access to the item that you need to embroider on. For example, a while back I was contacted past a priest (or at least I call up he was a priest) who needed some religious symbol embroidered on some hoods. He could not ship me all of these hoods, so he requested that I stitch out the pattern as patches, then transport them to him. He would atomic number 26 them on.
Patches are also fun for kids. If you brand them some patches, they can put them wherever they wish. The tin decorate their backpacks, jeans, hats, duffel bags etc with patches. Actually, come to recall of information technology, making a kid a patch for different achievements might be a clever parenting hack. Hmmmm…..
Why employ SewArt and SewWhat Pro to digitize a patch?
SewArt and SewWhat Pro are probably the most inexpensive embroidery software on the market. SewArt is for converting art into stitches and SewWhat Pro allows you to combine designs, reorder elements, add text, etc… They work very well in combination with one some other. See my previous postal service that explains the differences betwixt SewArt and SewWhat Pro.
I of the advantages of these programs is that y'all tin employ them for xxx days and actually export embroidery files in a multifariousness of formats that you tin stitch out on your embroidery machine.
How to digitize a logo using SewArt and SewWhat Pro
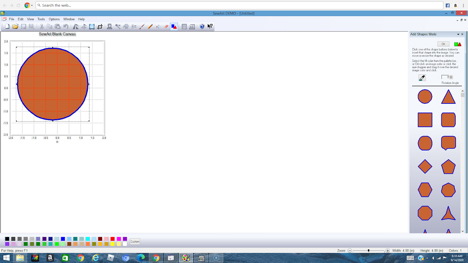
Create a simple circle
You volition begin this project in SewArt where you will create the appliqué circle for the patch. You simply utilise the circle tool to draw a circle for the size of the patch you lot desire. I fabricated my circle about 3.five″ in bore. It was large enough to adjust the embroidery design I wanted on the patch. To come across the dimensions of the shape yous are creating, be sure to plough on your grid (View->Filigree).
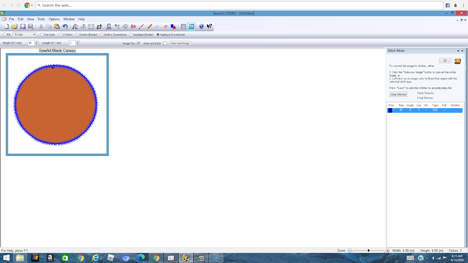
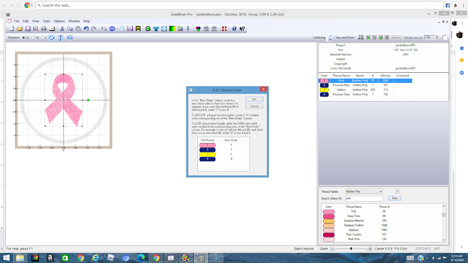
Convert the circumvolve to stitches
Now your epitome is ready to convert to stitches. Click on the sewing machine icon to start defining your run up area.
Start you demand to change your settings to:
- 45 as height
- iii every bit length
- Appliqué centre line as the stitch type
So, click on the outline of the circumvolve and save your design as an embroidery file. I used .human foot.
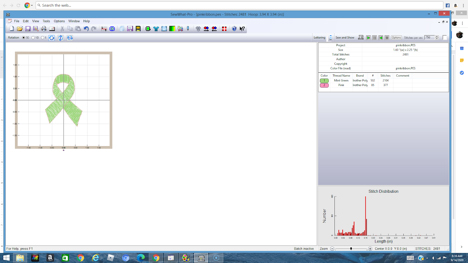
Import your embroidery blueprint
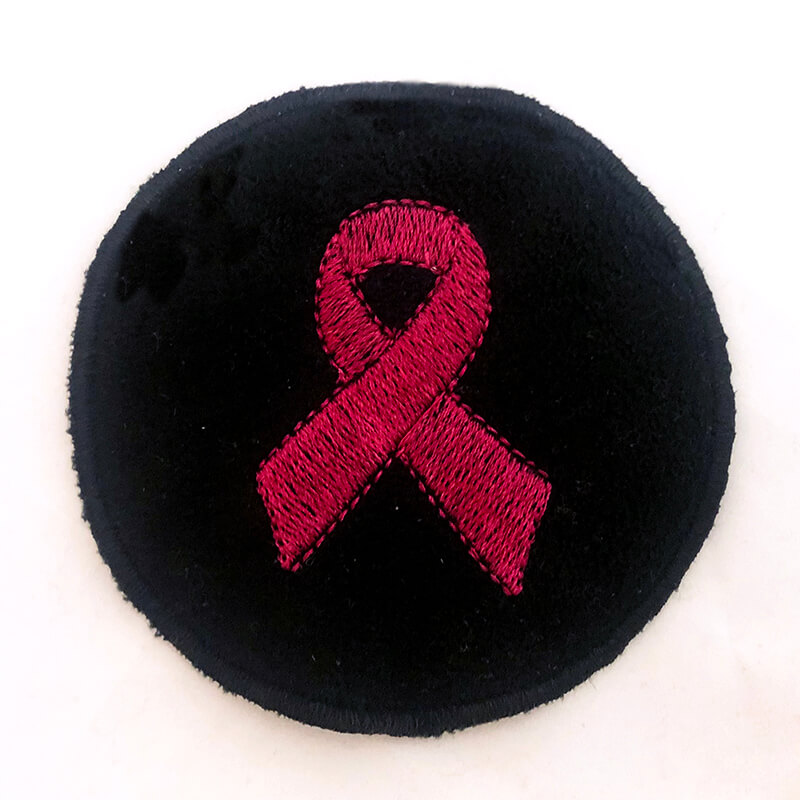
Now leap over to SewWhat Pro which gives you the ability to bring files together. Starting time, open your embroidery blueprint that you desire to sew on the patch. In my example, the embroidery design is a pink awareness ribbon. If you lot want to digitize a different pattern for your patch, follow my tutorial on how to convert a JPG file to an embroidery design using SewArt.
For some reason, when I opened the awareness ribbon, it is green with a pink outline, so I began by making both the fill expanse and the outline pinkish using the Bring together Threads feature. Information technology is now all one colour which is fine considering I don't need the embroidery machine to terminate betwixt stitching the fill and the outline.
Merge in the appliqué circle
Next, I need to bring in the appliqué circle. And then, I choose Edit -> Merge In to bring in the circle pattern I but created in SewArt.
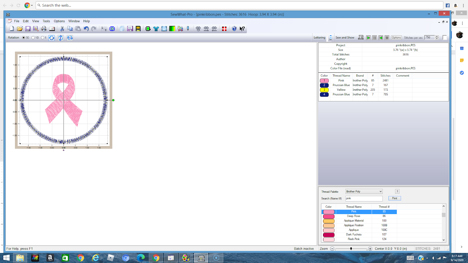
Reorder the threads
But there is just ane issue, the appliqué circumvolve is set up to run up afterward the pink ribbon, and then nosotros demand to change the order of the elements. Simply go to Edit-> Order Threads.
Now the pink ribbon is gear up to be stitched last, and the circle part of the patch will be stitched first.
Before you export the design to stitch information technology on your embroidery machine, you may need to make a slight tweak. The demo version of SewWhat Pro volition only allow you to stitch out 3 color stops, so you tin delete the center color in the circle appliqué. When you are stitching out the pattern, yous can just run up the first color twice, one time for a placement line and another time for tack down stitching of your appliqué textile.
How to stitch out the resulting patch
For a full explanation and video on how to sew together out a patch using your embroidery motorcar, refer to my previous post where I accept you lot through all of the steps and materials needed to sew together out a patch on your embroidery machine.
'
Desire to acquire more about SewArt, SewWhat-Pro and SewWrite?
Cheque out my grade: the SewArt, SewWhat-Pro and SewWrite Master Course.

All the same non sure how I digitized a patch? Check out my video where I take you through the entire process.
Promise this helps!
Happy stitching
xo
Julie
Want to call back this? Relieve "How to to digitize a patch using SewArt and SewWhat Pro" on your favorite Pinterest board.
Beloved free motorcar embroidery designs?
Categories
Thanks for Visiting

everinghamwelition.blogspot.com
Source: https://www.machineembroiderygeek.com/how-to-digitize-a-patch-using-sewart-and-sewwhat-pro/
0 Response to "Sewart Convert Pictures to Applique Make Logos Art!"
Post a Comment